|
How to Load a Dishwasher
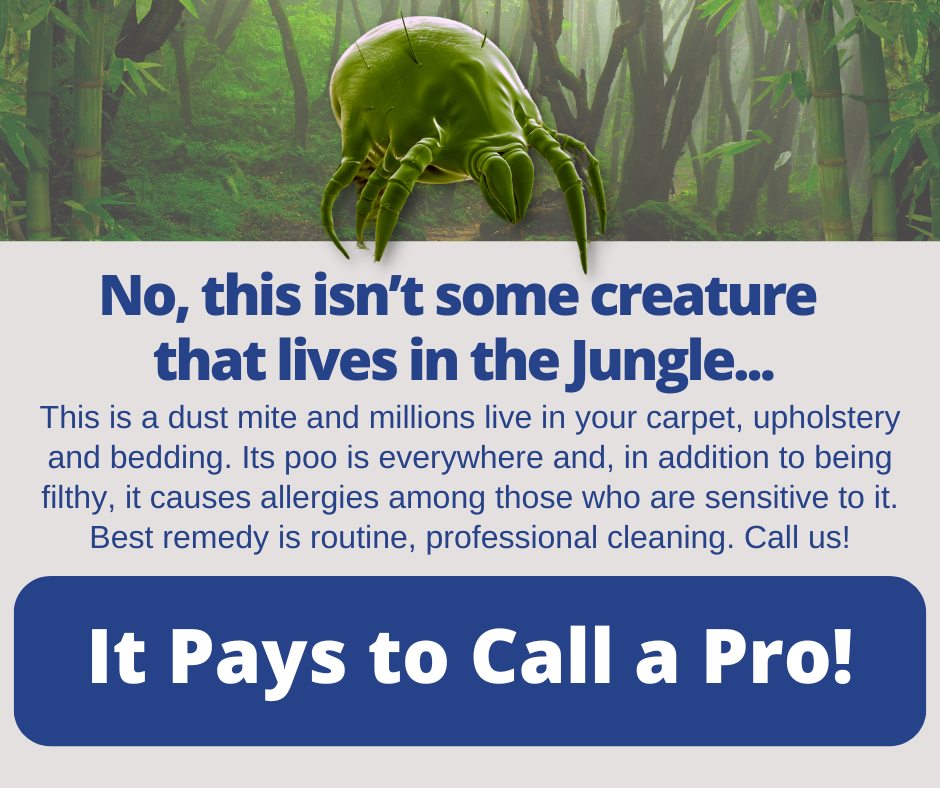
You open the dishwasher, pull out a rack, and drop a dish into a slot. You keep doing that until there is no more room and push “start.” Is that the best way to load a dishwasher? Loading a dishwasher may seem like a simple task, but doing it right means sparkling clean dishes, and doing it wrong means scraping the crud your dishwasher missed and then just redoing a load. There are a few easy, expert tips you can implement to get the most from your faithful dishwasher. Pre-Rinse You don’t need to do this with a modern dishwasher. They are designed to remove food residues, and they do it well. While you should scrape large food particles from your dishes, put them in the dishwasher dirty. Give your dishwasher a chance. Dish Placement If you want hot water to spray easily on all surfaces, put large items on the bottom rack, as the directions should say. Face them inward toward the spray jets, but leave room for water to spray up and past those, reaching other dishes. Your dishwasher may have more than one spray arm, but it doesn’t hurt to leave gaps between dishes so more water flows throughout the interior. The Top The top rack, that is. All your smaller items go here, including cups and glasses. Place everything so dishes won’t tip over. If you have plastic dishes to wash and are concerned about the high heat and possible warping, those should go right at the top. If you are really concerned, you know what to do: Wash by hand. Utensils Your dishwasher has a special place for utensils, and you might think, “I’ll just put them all in there, and all good.” That might work, but some utensils, such as forks and spoons, can stick together, limiting cleaning. Put some upright, some upside down, and leave room for water circulation. The Right Stuff When choosing a detergent for your dishwasher, do your research. Look at the reviews. If your dishwasher has a prewash option, use it. It’s there for a reason. While you may do your dishes, you should leave some cleaning for the professionals, such as your carpet, furniture, and hard floors. Those are tougher than dishes. After all, it pays to call a pro! The Dirty Sponge
We all need towels, rags, or sponges to clean hard surfaces in our homes. The ubiquitous sponge is a very common one found in virtually all kitchens and most bathrooms. They are used to clean everything, from dishes to countertops to stovetops and more. And while we tend to toss paper towels into the garbage can, or wash cotton or other cloths when we do the laundry, at times the sponge can be used and reused and weeks—even months—can go by without cleaning the sponge itself. How can you clean and reuse sponges? According to the United States Department of Agriculture (USDA), your microwave or dishwasher is one of the best ways to clean them and kill bacteria simultaneously. They can eliminate nearly 100 percent of bacteria, helping you to maintain proper hygiene practices. For cleaning and disinfecting sponges in the microwave, thoroughly wet the sponge before putting it inside. Do not microwave a dry sponge, that’s a fire hazard. Microwave the wet sponge on high for just one minute. That zaps the bacteria. Take it out, thoroughly wash it with soap and water, and wring it out and you now have a fresh, clean, healthy sponge to use again. Your dishwasher is effective as well, but not as quick. When you wash your dishes, put it on the top rack and let the dishwasher do all the work. It’s pretty simple. Having the drying option activated means it gets that high heat, which will kill bacteria. But there comes a time when you need to make a hard decision. Yes, that sponge has been faithful, but a kind but firm farewell is warranted after so many uses. The USDA recommends replacing sponges every two weeks to minimize the risk of bacteria buildup and even more often if they get a funky odor. Most do not follow this recommendation, but it's an option if your budget for sponges is healthy. Other maintenance tips include wringing them out in hot water after every use and allowing them to dry completely by putting them in a spot that provides fresh air and even sunshine, which is often possible in a kitchen. Keeping your home nice and clean and healthy is important, and besides doing some of the tasks yourself, there is a better way. Call your favorite cleaning company today, especially for those tough project jobs such as tile and grout cleaning, carpet cleaning, and furniture care. After all, it pays to call a pro! Create a No-Pet-Hair Furniture Zone
As pet owners, we love our furry creatures and the company and comfort they bring to us. But with that is one challenge we often face: Dealing with pet hair on our furniture. If you're tired of constantly battling pet hair on your sofa, loveseat, chairs, or anything that is made of cloth, here are some effective strategies to keep your furniture looking clean and pet-hair-free. Vacuum for the Deepest Clean The most basic and efficient method to removing pet hair from your furniture is by thorough, detailed vacuuming. Regular vacuuming using an upholstery brush attachment can remove loose pet hair and also embedded dander, which is what causes allergic reactions. If you don't have the proper attachment, consider investing in a universal attachment set with an upholstery brush and a crevice tool for those hard-to-reach areas. There are many small, hand-held devices that are perfect for this. Use Hair Removal Tools Turn to handy tools like sticky rollers and furniture brushes between vacuuming sessions. Oversized sticky rollers or those with extendable handles are particularly effective on upholstered furniture, covering more surface area with each pass. Common Household Items You don't always need specialty tools to combat pet hair. Everyday household items can be just as effective. A straightforward method is to put on a rubber glove, dampen it, and run your hand over the sofa's surface, causing the hair to ball up for easy pickup and disposal. Groom Your Pets Prevention is a great way to keep your furniture pet hair-free. Regularly groom your pet with guidance from your vet or groomer to reduce shedding and maintain a healthy coat. Grooming gloves, which help reduce shedding and straighten hair follicles, can effectively remove pet hair from your couch. Now what? Vacuuming, hair removal tools, everyday household items, textile preparation, and regular grooming of your furry companion can make all the difference in keeping your furniture fresh and comfortable for you and your pets. But there’s more! Don’t forget that removing pet hair is just part of maintaining your furniture. Having your furniture professionally cleaned on a regular basis is recommended. Do the right thing and call your favorite cleaning company now for an appointment. After all, it pays to call a pro! |
ALPHA CARPET & RUG CLEANING Mound, MN
Call 763-479-6800 Archives
May 2024
Cleaning OutPost Mound MN
|

 RSS Feed
|
|
Would you like to get your own OutPost Site? Cleaning and restoration firms who are MarketingZoo.com members get
|
CleaningOutpost.com Directory of Cleaning & Restoration Businesses is a service offered by MarketingZoo.com
Copyright 2015 Thinkshortcut Publishing, LLC
Copyright 2015 Thinkshortcut Publishing, LLC